Step 1
When beginning to measure a space, choose a corner to start and end at. The main door to the space is a good anchor point. Start by measuring between the wall and the door. When measuring a door or to a door, ignore the trim width. A good trick is to simply measure the door itself for the exact height and width. When measuring a window or to a window, ignore the trim as well for the height
and width. Once all of the segments are measured for a wall, remember to take an overall dimension.
Step 2
It is important to take a measurement from the fl oor to the ceiling to establish a ceiling height for each room. Also make sure to measure wall thicknesses when possible. For example, on lowered beams, doorways, etc. If using a photo measuring app to document these dimensions, it is nice to have something in the photo for scale such as a pet or another person. When taking photos of a space always remember to show a portion of the wall from the previous picture for orientation.
Step 3
For any beams, so ffits or doorways, always take a vertical dimension from the
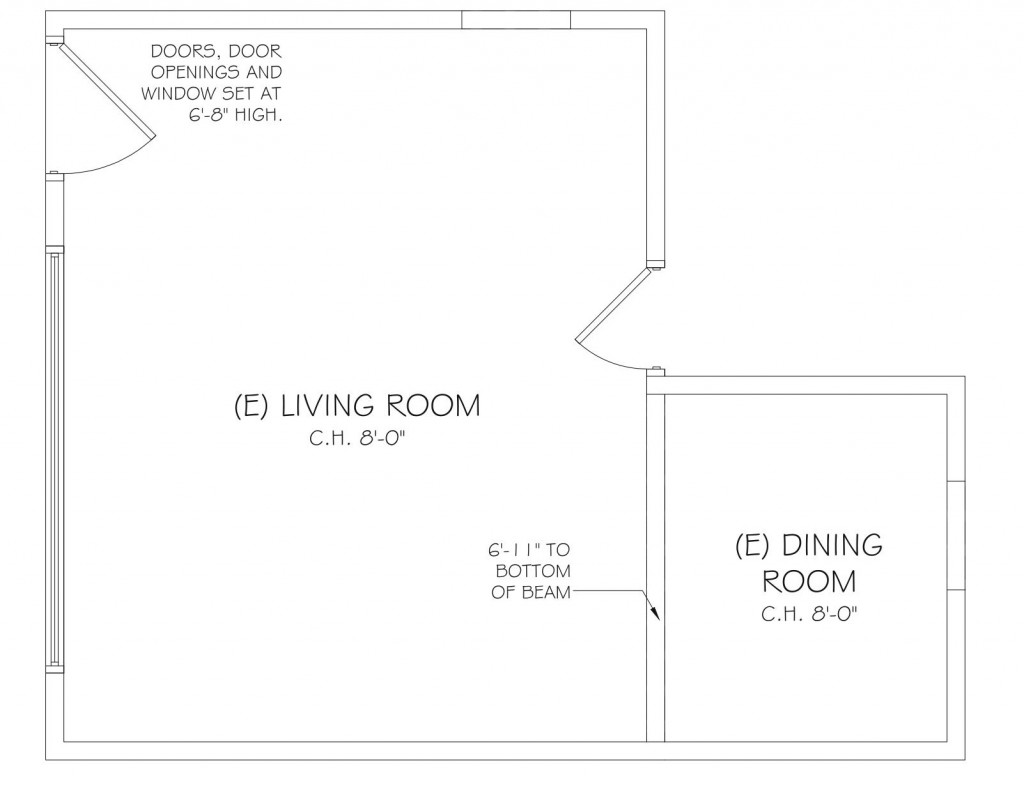
floor to the bottom. Like in this example, some rooms may be split by a lowered beam. Use this as a wall and measure to it to break up a large wall. For longer dimensions using a measure tape, it may be useful to have a helping hand. Once all of the segments are measured for the wall, remember to take an overall dimension. For checks and balances, measure room openings like the one in this example.
Step 4
When measuring a non-rectangular space, make sure to document the wall transitions for easier orientation. Once all of the segments are measured for the wall, remember to take an overall
dimension and check the ceiling height again. For sloped ceilings, measure the vertical height where the ceiling is the lowest and again where it is the highest. You can then establish an angle with a horizontal dimension to figure out the slope of the ceiling.
Step 5
For the final wall of the space, take all of the needed horizontal and vertical dimensions and end at the corner you started measuring. Once all of the segments are measured for the wall, remember to take an overall dimension. Using photo measuring apps is a great way to quickly document your space with visual references. Simply download Photo Measures by Big Blue Pixel Inc. or another measuring app, take and upload photos of your space and start measuring.
Step 6
Another way to document your space is by drawing a 2D floor plan. Using graph paper helps to scale each room proportionally, and using different colors will keep notes organized. Make sure to clearly document each wall, door and window height/width, ceiling heights, wall thickness and overall dimensions. Always indicate door swing, windows and beams/doorways as shown above. It is also helpful to make additional notes as you find necessary and always take photos for more detail.
Step 7
Once your space is completely documented, a 2D floor plan can be generated based on the photos and/or sketches of your space or entire house. Simply upload
files of your existing conditions and any ideas or inspiration for your new design to our website. Once received, an existing drawing like this will be created and the design process can start!
Helpful Tools
Photo Measures:
http://bigbluepixel.com/photo-measures/
EasyMeasure:
https://itunes.apple.com/app/easymeasure-measure-your-camera!/id349530105?mt=8&ign-mpt=uo%3D4
RoomScan Pro:
https://itunes.apple.com/us/app/roomscan-pro-app-that-draws/id673673795?mt=8
Pitch Gauge:
https://itunes.apple.com/us/app/pitch-gauge/id389715382?mt=8
Roof Sketch Pro:
https://itunes.apple.com/us/app/roof-sketch-pro/id667675474?mt=8
Bubble Level:
https://itunes.apple.com/us/app/bubble-level-free-for-iphone/id465613917?mt=8


